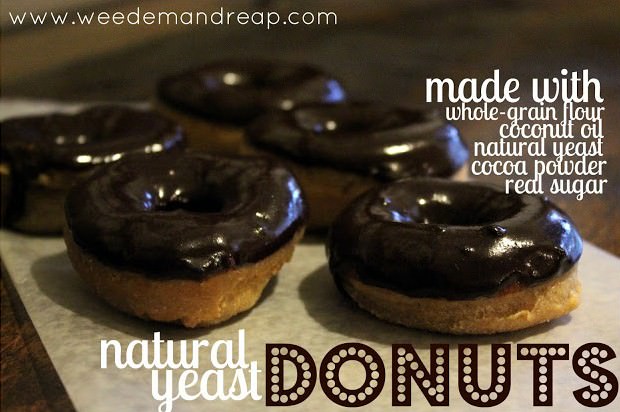
Is it donut or doughnut? Well, I’m pretty sure the deliciousness of donuts deserves two names anyway.
One of the best things about baking with natural yeast (or sourdough, or wild yeast — they’re all the same thing) is that the dough does AWESOME when frying! Even if you are using whole-wheat flour (which I do), these donuts always come out light and fluffy and delicious! Are you wondering what the heck natural yeast is or why I bother with it? Check out my post here.
I discovered these donuts by beautiful accident. I was initially working towards a loaf of bread, but my dough just wasn’t rising like I wanted it to. It was taking longer than usual. And if you know anything about natural yeast, “longer than usual” means a LONG TIME. My dough was rising, but hadn’t doubled in size until about 12 hours — yikes.
I was glad to make donuts out of that slow-rising dough, but I wanted to see if I could still succeed with a “normal” dough, and I’m happy to announce, I did!
So, whether your dough is crawlin’ along slowly rising, or rising fast (4-6 hours is fast in the natural yeast world), this recipe is GUARANTEED to work!
And to make things simpler, all you have to do is use my basic bread dough recipe found here.
Here’s what I discovered also by FAILING on that initial slow-goin- dough.
The reason why my dough took so long to rise is that I had added too much sweetener. From my experience, natural yeast does best with only a small amount of sugar (1-2 TBS.) I had added 1/3 c. in my experiment and for some reason it slowed the leavening process down. But no worries, I have now learned my lesson.
So, how do these donuts taste so amazing with such a small amount of sweetener? Well, my friends, it’s all in the delicious chocolate glaze! Now let’s get to this recipe!
Natural Yeast DONUTS!
Makes (36) 3 inch donuts
Get your natural yeast starter all nice and fed & bubbly, then make…
1 batch of my “UN-sour” natural yeast dough found here.
(No need for a second rising in these donuts. Just let your dough rise once, covered, in a warm area for 4-6 hours, then fry those babies up!)
1-2 cups coconut oil
Directions: Heat your coconut oil in a deep pan. Roll out your dough to about 1/2 inch thickness on a surface that is dusted with arrowroot powder (prevents sticking and prevents you from introducing unprepared grains into your properly prepared dough). Using a cup, or whatever else you have, cut out circles, then use something small to cut out the tiny holes. I used a cake decorating tip. Or just buy this crazy cheap donut cutter. Fry donuts on each side about 1 1/2 minutes or until they start to become light brown — don’t overcook! Place on a counter to cool as you prepare the glaze.
Chocolate Doughnut Glaze:
adapted from Alton Brown’s recipe here.
1/2 cup organic grass-fed butter
1/4 cup whole milk (preferably raw, grass-fed)
1 TBS. honey
2 tsp. real vanilla extract
3 TBS. cocoa powder
1 1/2 cups organic cane sugar (blended in a blender to create powdered sugar)
Directions: In saucepan over medium heat, melt & whisk butter, milk, honey, vanilla & cocoa powder. Remove from heat and whisk in sugar. Dip the top half of a fried donut in the chocolate glaze and let cool.
Then try your best not to inhale 4 of these in a sitting.
What the heck, if you made natural yeast donuts then have at it! Just be sure to hide in the closet when you do — it’s more fun that way.
This post is a part of : Blog Stalking Thursdays, Pennywise Platter, The Country Homemaker Hop, Foodie Friday, Food-tastic Friday, Fresh Bites Friday, Clever Chicks Monday, Fat Tuesdays

I’ve never really loved donuts, but once in awhile I get a crazy craving for them. But I feel so guilty about eating them, it takes all the joy out of it. And homemade paleo donuts are definitely NOT the same. So I’m definitely going to try these soon! My question is, do you use the cut out part to make donut holes and is the frying time the same?
Hi Kassia-
Yep you can use the cut out part to make donut holes. Fry them for about a minute, or until they reach that same golden color as your donuts. Enjoy! Thanks -Bobbi (DaNelle Assistant)
Do you let the dough rise before shaping into donuts or after? I would assume after, but wanted to be sure!
Just the rise once before shaping. No need to rise after 🙂
This weekend…your recipe and I have a date. My family will LOVE me if I can perfect these! We do donuts every Christmas morning, but we do the canned biscuits cut out into donut shapes. Then you dip in frosting and toppings. They are a favorite tradition, but bleh on the ingredients. Since we starting eating this way I have tried a couple recipe and it has NOT been a success. So last Christmas I opted for the organic canned buttermilk biscuits. A step up, but certainly not my ideal. I am so excited to try these! Thanks!
These look yummy! What is the calorie content on them?
Those look AMAZING!!! My husband is always wanting to buy donuts when he goes shopping with me…. so this would be great! 🙂 Thanks for sharing!
This looks delicious!
CuteyPatutyCrochet
I always enjoy recipes that describe the baking process–this was great! Your donuts look mouthwatering!
Wow this looks amazing! I am going to try these out for sure! I am a new follower from southern charm! I would love for you to check out my blog and hopefully you will want to follow me back. Happy weekend! Nicole!
I’m with Briana, I’m pinning this recipe for later. I just started milling my own wheat and I’m still working out how exactly to bake with it in comparison to all purpose flour. Once I get it figured out, I’m making these. Oh yes I am.
Whoa these look amazing! Saving this recipe for later.